
Introduction
Preparing a detailed and clear lifting plan diagram is a key responsibility of an Appointed Person (AP) in lifting operations. A good diagram ensures safe execution by visually communicating the lifting operation, obstacles, equipment, and crew roles.
In this guide, you will learn:
Important elements to include in a lifting diagram
Recommended free tools to draw your lifting plan
Step-by-step method using draw.io (diagrams.net)
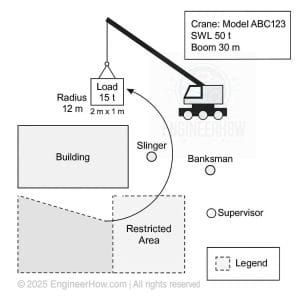
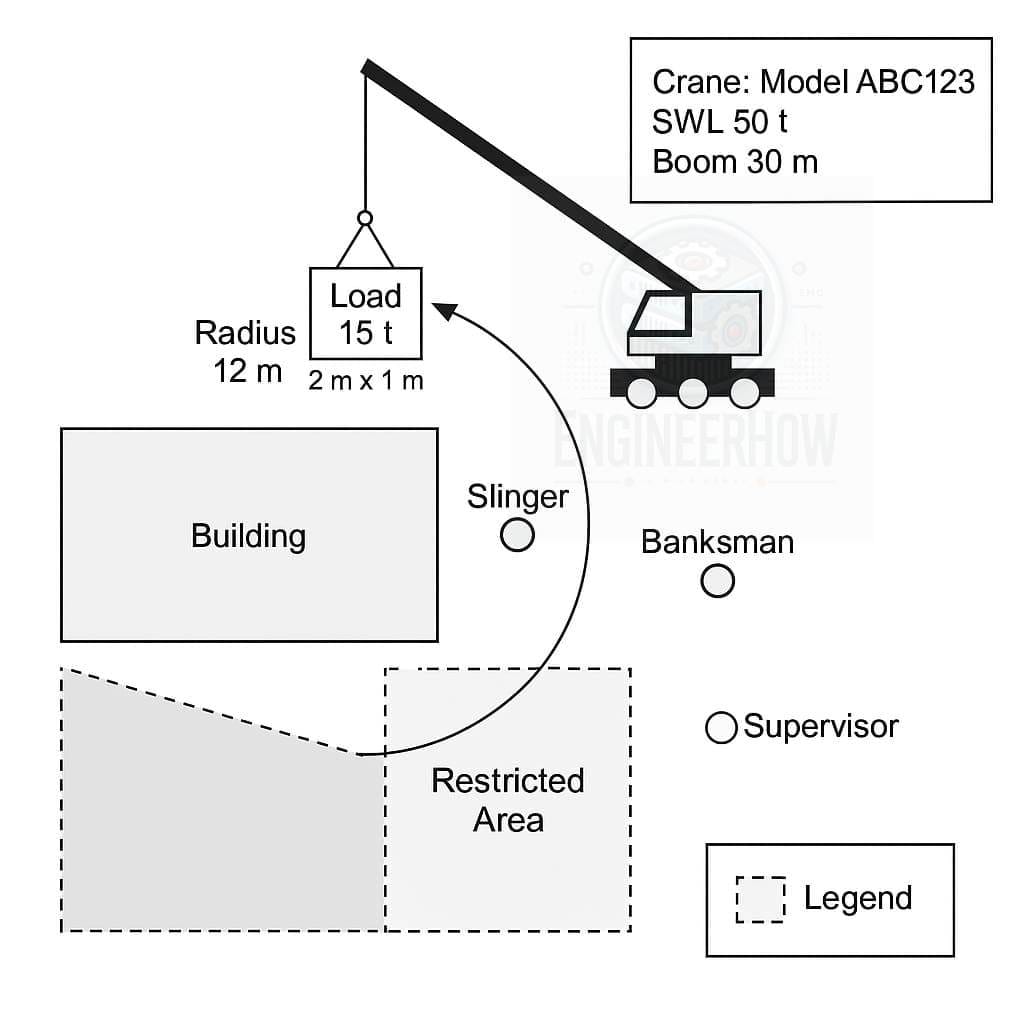
Example Diagram Preview:
✏️ Part 1:
Important Information to Consider for Drawing a Lifting Plan Diagram (for Appointed Person)
When an Appointed Person prepares a lifting plan, the lifting diagram must include these critical elements:
| Category | Details |
|---|---|
| Crane Information | Make, Model, SWL (Safe Working Load), Boom Length, Outrigger Positions |
| Load Information | Load Weight, Dimensions (L x W x H), Load Center, Type of Load |
| Lifting Accessories | Type (slings, shackles, spreader bars), SWL of accessories |
| Site Layout | Position of crane, load, obstacles, restricted zones, exclusion zones |
| Ground Conditions | Ground bearing capacity, matting requirement (if any) |
| Lifting Points | Pick-up and setting-down points clearly marked |
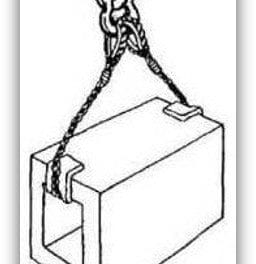
| Slinging Method | How the load is slung (single leg, 2-leg, basket, choker) |
| Radius and Height | Radius from crane center to load, lifting height |
| Personnel Roles | Crane Operator, Banksman/Slinger, Appointed Person, Supervisor |
| Safety Precautions | Tag lines, wind speed limits, communication methods |
| Load Chart Usage | Indicate crane configuration matches load chart used |
| Risk Assessment Reference | Cross-reference to overall risk assessment and method statement |
📐 Part 2: Drawing Tools
Recommended Free Software to Draw Lifting Plan Diagrams
| Software | Features | Download Link | Best Use Case |
|---|---|---|---|
| draw.io (also called diagrams.net) | Free, online and offline use, templates available, easy drag and drop | Download draw.io Desktop | Simple lifting plans with shapes and labels |
| LibreCAD | Open-source 2D CAD, DWG/DXF file support | Download LibreCAD | More technical engineering lifting plans |
| Inkscape | Free vector graphics editor, detailed diagrams, custom illustrations | Download Inkscape | High-quality, printable lifting diagrams |
| Lucidchart (free limited version) | Online, professional templates for flowcharts and layouts | Use Lucidchart | Quick online lifting plans |
| QCAD | Professional 2D CAD system, open-source version available | Download QCAD | Detailed CAD lifting drawings |
Most Common/Easiest Recommended = draw.io (diagrams.net)
(Because it’s simple, fast, and good for both beginners and professionals.)
Additional Important Free or Easy Software for Lifting Plan Preparation (Drawing + Calculation)
Besides drawing software, you can use some specialized apps and software to calculate crane radius, lifting height, ground pressure, sling forces, etc.
Here’s a list:
| Software/App | Features | Platform | Download/Access | Best for |
|---|---|---|---|---|
| Crane Lift Calculator (CLC) | Simple app for radius, load weight, boom angle, lift height | Android (Mobile) | Google Play – CLC | Quick field calculations |
| Liebherr Crane Planner 2.0 (Free Version) | Detailed 3D lifting planning with real crane models, radius, lifting points, outrigger loads, etc. | Windows (PC) | Liebherr Crane Planner Download | Professional lifting plan, radius, ground bearing |
| Crane Bee | App for lift planning including accessories selection, basic risk checks | Android | Google Play – Crane Bee | Mobile lifting plan assistant |
| Manitowoc Lift Solutions | Mobile app for Manitowoc cranes, lift radius, height, loads | Android / iOS | Manitowoc App | Field lift planning |
| Load Moment Indicator Simulators (Various Brands) | Helps simulate crane setup, radius, load charts | Varies (Manufacturer Sites) | Example: Tadano LMI Simulator | Operator training, AP calculations |
| AutoCAD Mobile App | Quick field CAD drawing on phone/tablet | Android/iOS | AutoCAD Mobile | Quick lifting diagram in field |
| Slinger Signaller AR App | (Experimental) Augmented Reality app for lifting signals and zones | iOS | Slinger Signaller AR | Safety checks and visualizing hazards |
🛠 Specialized Calculations You Can Perform with These Apps:
| Task | Tool |
|---|---|
| Crane Radius Calculation | Crane Lift Calculator, Liebherr Planner |
| Lifting Height Estimation | Liebherr Planner, Manitowoc App |
| Ground Bearing Pressure | Liebherr Planner |
| Pad Size Calculation | Liebherr Planner (based on outrigger force) |
| Sling & Accessory Load Calculation | Crane Bee |
| Risk Assessment and Hazards Listing | Crane Bee, Slinger Signaller AR (basic visual) |
🧮 Part 3: Calculation Tools and Apps
When preparing a lifting plan, Appointed Persons must not only draw the lifting diagram but also calculate:
Crane radius based on load movement
Height of lift considering boom angle
Ground bearing pressures to ensure safe support
Size and capacity of pads/mats
Load on lifting accessories like slings and shackles
Identification of site hazards and risk management
For this, use specialized free tools like:
Crane Lift Calculator (CLC) (Mobile radius calculator)
Liebherr Crane Planner 2.0 Free (Professional desktop software)
Crane Bee (Mobile lifting plan assistant)
Load Moment Indicator Simulators for real crane models
🎯 Part 4: How to Use draw.io for Lifting Diagrams
How to Draw a Lifting Plan Diagram Using draw.io (Desktop)
Step 1: Download and Install
Visit: draw.io GitHub releases
Download the installer for your operating system (Windows/Linux/macOS).
Install the software normally.
Step 2: Open a New Blank Diagram
Launch draw.io.
Select “Create New Diagram” → Choose Blank Diagram → Name it (e.g., “Site Lift Plan”).
Step 3: Setup Basic Layout
Create a site layout using rectangles for buildings/obstacles.
Use a large circle or rectangle to indicate the crane area.
Mark outrigger positions.
Step 4: Add Crane and Load
Use a triangle shape or an arrow to show the crane boom.
Draw a load as a rectangle or circle.
Label load weight, dimensions, COG (center of gravity).
Step 5: Add Movement Paths
Use arrows to show the lifting movement — from pickup to placement.
Clearly mark lifting radius (e.g., 8m, 12m) near the crane.
Step 6: Add Roles and Safety Zones
Insert small shapes and label them for Slinger, Banksman, Supervisor.
Mark restricted areas, exclusion zones, and danger zones using dashed lines or shaded areas.
Step 7: Final Touches
Add text boxes for crane details, load information, and safety notes.
Insert a Legend/Key to explain colors, lines, and symbols used.
📐 Simple Top View Layout (Concept to Draw on draw.io)
Here’s the structure you will create step-by-step in draw.io (or you can import it directly if you want):
✏️ Basic Elements:
| Element | Shape | Details |
|---|---|---|
| Crane | Rectangle or Circle | Place near one side, label Crane Name/Model |
| Crane Outriggers | Short Rectangles | Extend from each side of crane |
| Load | Rectangle | Show pickup and setting down point |
| Load Path | Arrow Line | From pick-up to placement |
| Ground Area | Outer Rectangle | Site boundary |
| Restricted Zone | Dashed rectangle | Around crane and load |
| Personnel | Small circles | Mark positions: Banksman, Supervisor |
| Legend Box | Text Box | Explain symbols |
📋 Simple Example Details
| Detail | Value |
|---|---|
| Crane | Zoomlion QY-30V Mobile Crane |
| Load | 8-ton generator |
| Radius | 8 meters |
| Ground | Firm, matting used |
| Sling | 4-leg chain sling |
| Pick-up Point | Near road |
| Placement | Inside fenced site |
📷 Visual Sketch (that you can draw in draw.io)
+----------------------------------------------------------+| || [Placement Point] || [Load 8T] || || || ↖ (Arrow: Movement Path) || || [Restricted Zone - Dashed Rectangle] || || || [CRANE: Zoomlion QY-30V] || [Outrigger 1] [Outrigger 2] || || (Banksman Here) || || Roadway ➔ Pick-up Point |+----------------------------------------------------------+Legend: Crane, Load, Movement Path, Personnel, Restricted Area
🖥 Step-by-Step Drawing in draw.io:
Open draw.io
Start Blank Diagram ➔ Save as “Simple Lifting Plan”
Create a Large Outer Rectangle (Site Boundary)
Add:
Crane (Circle or rectangle shape)
Outriggers (small rectangles on each side)
Load (Small rectangle)
Draw Arrows from load pick-up to placement
Mark Restricted Zone with dashed line rectangle
Add Personnel (small circle shapes)
Insert Text Boxes to label:
Crane name/model
Load details
Radius (8m)
Personnel roles
Insert a small Legend/Key explaining shapes/colors.
Save and Export as PDF or PNG.
Here is your ready-to-import draw.io file for a Simple Top View Lifting Plan Diagram:
👉 Download Simple_Lifting_Plan_Top_View.drawio
📥 How to Use:
Go to draw.io
Click “File” > “Import From” > “Device”
Select the downloaded
.drawiofile.Edit/Modify as per your project!
Here is the updated Simple Lifting Plan Diagram with a crane radius circle included:
👉 Download Simple_Lifting_Plan_Top_View_With_Radius.drawio
📥 How to Use:
Go to draw.io
File ➔ Import From ➔ Device
Upload the
.drawiofile and edit as needed!
📋 How to Export Your .drawio Lifting Plan as a Real Diagram PDF
✅ Follow these quick steps:
Open draw.io (diagrams.net)
Go to: https://app.diagrams.net/Import the File
Click File → Import From → Device
Select the
.drawiofile you downloaded (example:Simple_Lifting_Plan_Top_View_With_Radius.drawio)
Adjust Layout (Optional)
Zoom and fit everything nicely if needed.
Check margins if you want it clean on A4.
Export to PDF
Click File → Export As → PDF
In export options:
Page Format: A4
Include a Border: Yes (recommended)
Crop: Disable (to maintain full view)
Scale: 100% or Fit to page
Then Download PDF.
✅ Now you will get a full professional real diagram PDF, exactly like a technical field lifting plan sheet!
🛠 Example Options you can select when exporting:
| Option | Recommended Setting |
|---|---|
| Paper Size | A4 |
| Margins | Small (5mm-10mm) |
| Border | Enabled |
| Background | White |
| Diagram Fit | Scale to 100% or Fit |
⚡ Short Summary:
.drawiofile ➔ open on draw.io ➔ export ➔ PDFYou get full drawing with crane, load, restricted zones, arrows etc. in proper graphical PDF.
🎯 Part 5: How to Perform Basic Crane Radius and Lift Height Calculations
Quick Example (using CLC or Manual Formula):
Radius = Distance from crane centerline to load center
Boom Angle = Measured from ground to boom
Lift Height = (Boom length) × (sin of boom angle)
Example:
Boom length = 40 meters
Boom angle = 60°
Lift Height = 40 × sin(60°) ≈ 40 × 0.866 = 34.64 meters
You can verify this quickly using apps like CLC or Liebherr Planner.
📢 Conclusion:
Drawing and calculating a lifting plan is made much easier today with free and easy tools available for both desktop and mobile platforms.
An Appointed Person must ensure not only a neat diagram but correct calculations for radius, height, ground bearing, and accessories selection for a safe lift.
✅ Always cross-verify load charts!
✅ Always use a practical risk assessment checklist with your diagram!
🎥 Bonus: Templates Download Links
lift-paln-software-Post-image.jpg
Simple_Lifting_Plan_Top_View_With_Radius.pdf
Lifting_Plan_Field_Checklist_Appointed_Person.docx
Simple_Lifting_Plan_Top_View.zip
Simple_Lifting_Plan_Top_View_With_Radius.zip
Full_A4_Lifting_Plan_Template_With_Example.pdf
Full_A4_Lifting_Plan_Template_FIXED.pdf
Check our YouTube for tutorials and guides: EngineerHow YouTube Channel
✅ Summary of What We Added Today:
✅ Full lifting plan diagram checklist
✅ Best free drawing software
✅ Best free calculation apps (mobile & PC)
✅ How to use draw.io
✅ How to calculate radius/lift height
✅ Bonus risk assessment tips


